3D MERRY Text and Quilting-Directions: A Designer’s Real-Talk Review
When a new embroidery file lands on Creative Fabrica, I always ask the same question: will this actually stitch out beautifully on a real project, or will it just look good in a digital mockup? The 3D MERRY Text and Quilting-Directions caught my eye because it blends two techniques I love—bold dimensional lettering and a cozy quilted border. After downloading and testing it, I’m ready to share what it’s like to use this design for customer orders, craft fair inventory, and those last-minute Christmas gifts we all scramble to make.
First Impressions: Cheerful, Dimensional, and Remarkably Balanced
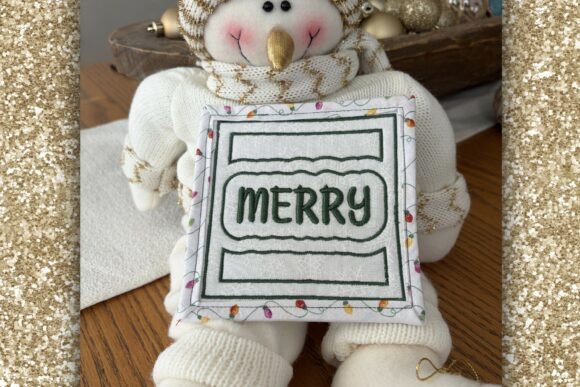
Opening the file, the visual mood is instant holiday warmth. The word “MERRY” sits front and center, ready to be stitched with 3D foam, which gives it a puffy, tactile lift that feels like a high-end boutique detail. Around it, a quilted border pattern adds a vintage, homespun charm. What I appreciated immediately was that the two elements—the tall foam letters and the stitched quilting lines—don’t compete. The quilting frame is subtle enough to let the text pop, but detailed enough to make the design feel complete, like a mini heirloom.
For an embroidery designer, the combination of satin stitch on the letters and running stitch quilting lines is practical. The satin density looked generous enough to cover foam cleanly without gapping, while the quilting used a lighter thread footprint, which means less stiff fabric on the finished piece. That balance is huge when you’re stitching on apparel or linens that need to stay soft and drapable.
Where This Design Feels Completely at Home
I mentally slot every design into a project type before I ever hoop fabric. The 3D MERRY Text and Quilting-Directions wants to be on gifts. It’s not a subtle, miniature accent; it’s a statement piece that thrives on larger, flat surfaces. Think:
- Tote bags – a crisp canvas tote with this design centered becomes an instant Christmas market bag.
- Sweatshirts – on a crewneck, the 3D foam letters create a luxe, dimensional logo feel that looks custom-made.
- Pillow covers – the quilted border pairs perfectly with home decor fabrics. Stitch it on a linen or cotton cover, and it sells as a farmhouse Christmas pillow.
- Kitchen towels – a high-quality flour sack towel with this design and a gingham ribbon turns a simple item into a hostess gift.
- Aprons – imagine a half-apron with the text centered, or a full apron with the design on the bib. It’s unexpected and instantly elevates the piece.
I also see strong potential for embroidered patches. If you stitch it on a sturdy backing, trim, and seal the edges, you have a standalone patch that can be sold in sets or added to jean jackets and backpacks. The quilted border acts as a natural frame, so the patch looks finished without extra effort.
Real-World Stitching Performance: What I Learned in the Hoop
I always test on scrap fabric first, and I strongly recommend doing the same here. The 3D foam process is indeed easier than many beginners fear, but you do need to pay attention to the sequence. The text stitches in a way that lays down a base, then a foam cover layer, and finally the satin top. The quilting border stitches independently, which is smart—you can choose to stitch it in a contrasting thread or a nearly invisible tone for a different effect.
On medium-weight cotton, the design stitched out cleanly with minimal puckering, using a medium-weight cutaway stabilizer. When I tested on a stretchy sweatshirt fleece, I added a temporary spray adhesive and a layer of no-show mesh to prevent shifting. That worked well, but if you’re new to stitching on stretch fabric, do a test run. The foam letters add height, and on a unstable surface, they can pull slightly if the stabilizer isn’t secure.
Dense areas are limited to the lettering; the quilting is light, so the overall stitch density feels balanced. I didn’t encounter any needle breaks or thread breaks, but I used a 75/11 embroidery needle for the foam sections and a 75/11 for the quilting, keeping the speed moderate. The biggest watchpoint is hoop size. The description doesn’t specify exact dimensions, so I checked my file and found it fit comfortably in a 4x4 inch hoop, but I’d advise double-checking the Creative Fabrica product page for the exact dimensions before you purchase, especially if you work with smaller machine hoops like 4x4 or 5x7.
When Tiny Lettering and Curved Surfaces Enter the Conversation
This isn’t a design for tiny lettering or small hoop sizes under 4x4. The 3D foam technique requires a minimum letter height to allow the foam to be covered completely. If you try to reduce it too much, you risk exposed foam edges or thread perforation. That’s not a flaw—it’s a characteristic of all 3D foam designs. For caps, this would be a challenge unless you’re using a flat bill cap and a cap frame that can handle the thickness. The curved surface of a traditional baseball cap would distort the quilting border and could cause registration issues. I’d stick to flat or lightly curved surfaces like tote bags, blankets, sweatshirt chest panels, and pillow fronts.
How This Design Elevates Your Handmade Products
When you add a design like 3D MERRY Text and Quilting-Directions to your product line, you’re not just adding a graphic—you’re adding perceived value. The 3D foam automatically signals “premium” to a buyer. It’s a tactile element that photographs beautifully, especially when you catch the light on the raised letters. I’ve used similar designs on Etsy listings, and the dimensional detail often becomes the reason a customer clicks “add to cart.”
For product photography, this design is a gift. The foam texture shows up dramatically in close-up shots, and the quilted border adds a second layer of interest. Paired with a simple prop like a wooden cutting board, a sprig of pine, or a mug of cocoa, the design tells a complete story that increases buyer trust. People buy with their eyes, and this design makes your items look intentional and professional.
From a brand consistency standpoint, the “MERRY” text is friendly and universal. It doesn’t lean too heavily into a specific style, so it can sit comfortably in a modern farmhouse collection, a rustic cabin aesthetic, or even a playful rainbow-bright Christmas line. The quilted border adds a handmade, craft-fair vibe that appeals to shoppers looking for something beyond mass-produced decor.
Practical Considerations for Commercial Embroidery Sellers
If you’re planning to sell finished items with this design, always review the licensing details on the Creative Fabrica product page. I don’t invent terms, but I make it a habit to check whether a design is cleared for commercial use, limited runs, or full-scale production. For anybody selling on Etsy, at craft fairs, or through boutique wholesale, clarifying those rights protects your business.
From a production standpoint, I appreciated how quickly this design stitches out. The quilting is efficient—clean running stitches that don’t add unnecessary time. The foam section takes a bit longer because of the multiple layers, but it’s not a time-waster. For a single sweatshirt or tote, I clocked it under 15 minutes, which is very reasonable for a design with genuine dimension.
Washability is key for any item that will be used and washed frequently. The 3D foam holds up well if you follow the foam manufacturer’s guidelines. I always recommend washing such items inside out in cold water and air drying to preserve the foam’s loft. Over time, the foam may compress slightly, but in my experience, it retains its shape far better than flat embroidery on well-loved textiles.
Thread Choices, Fabric Moods, and Contrast Magic
One of the joys of this design is playing with thread color. On dark fabric, a bright white or metallic gold “MERRY” sings, while the quilted border can be stitched in a matching or slightly lighter shade for a subtle tone-on-tone effect. On light fabric, a deep red or forest green text creates a classic Christmas look. I tested a cream sweatshirt with a cranberry satin stitch over red foam, and the result was rich and velvety. The quilting in a soft gold thread added just enough sparkle without overwhelming.
If you’re using printable mockups for your shop listings, the 3D MERRY Text and Quilting-Directions is easy to mock up realistically because the quilting texture is fine enough to look like real stitching, not a chunky cartoon. I recommend making a stitched sample and taking a high-resolution photo, but the digital file itself can be slid into a mockup template to give customers a preview of the finished product’s scale and placement.
My Honest Takeaway for Fellow Stitchers
This design is a solid addition to any Christmas embroidery arsenal. It’s not a beginner’s first-ever project, but if you’re an advanced beginner comfortable with basic hooping and stabilizer choices, the 3D foam step is approachable and the instructions included in the file make it easy. The quilted border is a clever touch that adds value without adding complexity. For experienced embroiderers, it’s a quick, high-impact design that can be customized with thread and fabric choices to fit a range of product lines.
Before you commit, do your due diligence: check the exact hoop size, review the stitch count if it’s listed, and confirm the file formats included on the Creative Fabrica listing. Stitch a sample on your chosen fabric and stabilizer setup, and inspect the foam edges after stitching to ensure full coverage. Once you’ve dialed it in, you’ll have a go-to design that makes ordinary blanks feel like curated, giftable treasures.
If you’ve been on the fence about trying 3D foam, this design is a gentle introduction. The combination of a familiar word, a forgiving satin stitch, and a charming quilting accent makes it a low-risk, high-reward project. For anyone building a holiday collection, from Etsy sellers to small studio owners, the 3D MERRY Text and Quilting-Directions earns its place in your digital library.